Creating a Partitioned Container with .NET SDK
In this lab, you will create multiple Azure Cosmos DB containers using different partition keys and settings. In later labs, you will then use the SQL API and .NET SDK to query specific containers using a single partition key or across multiple partition keys.
If you have not already completed setup for the lab content see the instructions for Account Setup before starting this lab.
Create Containers using the .NET SDK
You will start by using the .NET SDK to create containers to use in this and following labs.
Create a .NET Core Project
- On your local machine, locate the CosmosLabs folder in your Documents folder
-
Open the Lab01 folder that will be used to contain the content of your .NET Core project.
-
If you do not have this folder, you did not run the
labCodeSetup.ps1script in the Account Setup steps. -
If you are completing this lab through Microsoft Hands-on Labs, the CosmosLabs folder will be located at the path: C:\labs\CosmosLabs
-
-
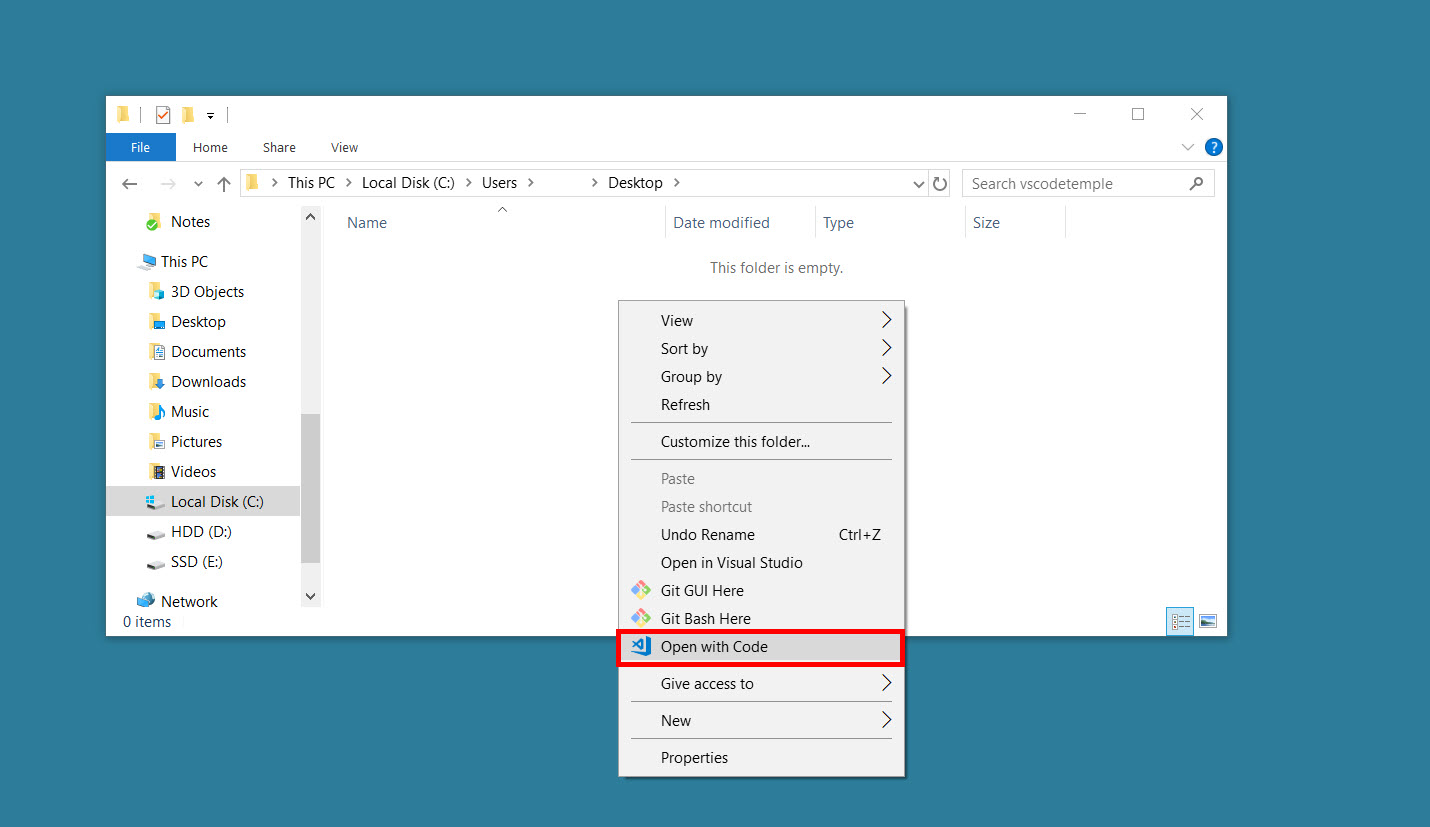
In the Lab01 folder, right-click the folder and select the Open with Code menu option.

Alternatively, you can run a terminal in your current directory and execute the
code .command. -
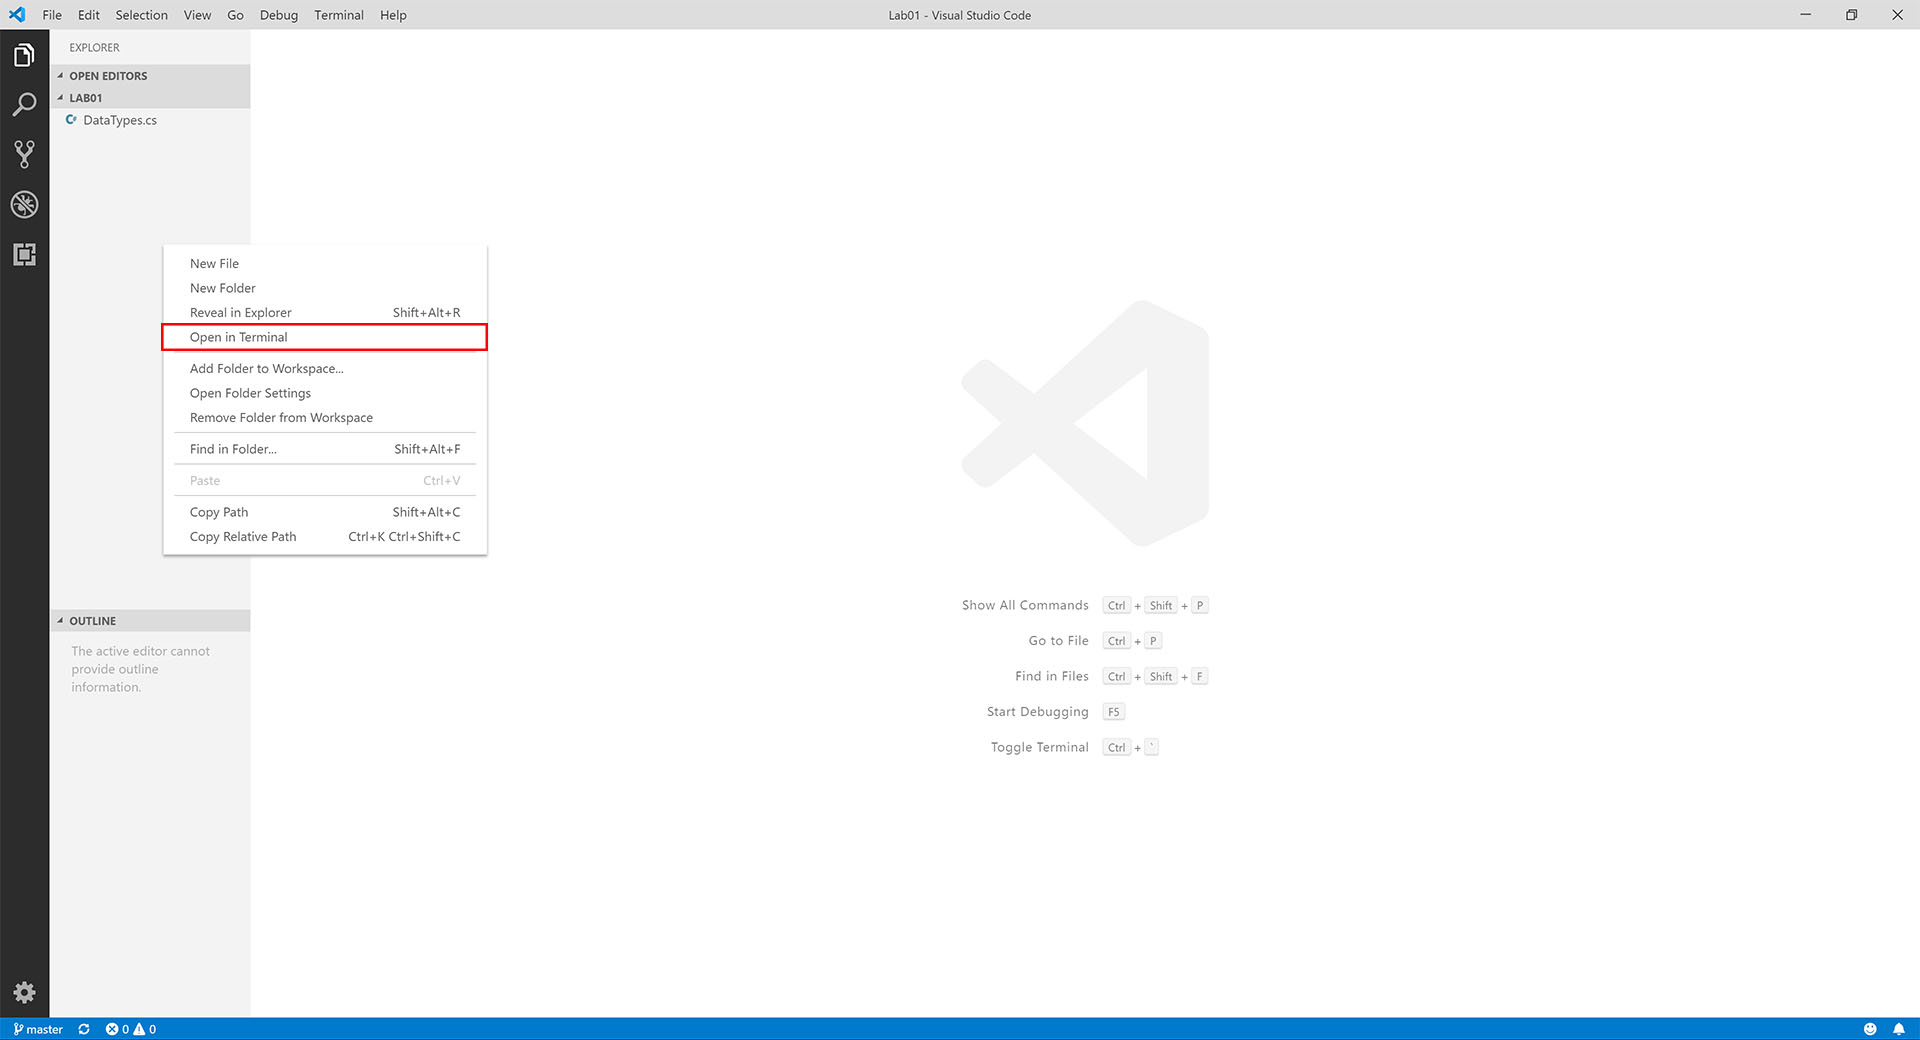
In the Visual Studio Code window that appears, right-click the Explorer pane and select the Open in Terminal menu option.

-
In the open terminal pane, enter and execute the following command:
dotnet new console --output .This command will create a new .NET Core project. The project will be a console project and the project will be created in the current directly since you used the
--output .option. -
Visual Studio Code will most likely prompt you to install various extensions related to .NET Core or Azure Cosmos DB development. None of these extensions are required to complete the labs.
-
In the terminal pane, enter and execute the following command:
dotnet add package Microsoft.Azure.Cosmos --version 3.12.0This command will add the Microsoft.Azure.Cosmos NuGet package as a project dependency. The lab instructions have been tested using the
3.12.0version of this NuGet package. -
In the terminal pane, enter and execute the following command:
dotnet add package Bogus --version 30.0.2This command will add the Bogus NuGet package as a project dependency. This library will allow us to quickly generate test data using a fluent syntax and minimal code. We will use this library to generate test documents to upload to our Azure Cosmos DB instance. The lab instructions have been tested using the
30.0.2version of this NuGet package. -
In the terminal pane, enter and execute the following command:
dotnet restoreThis command will restore all packages specified as dependencies in the project.
-
In the terminal pane, enter and execute the following command:
dotnet buildThis command will build the project.
-
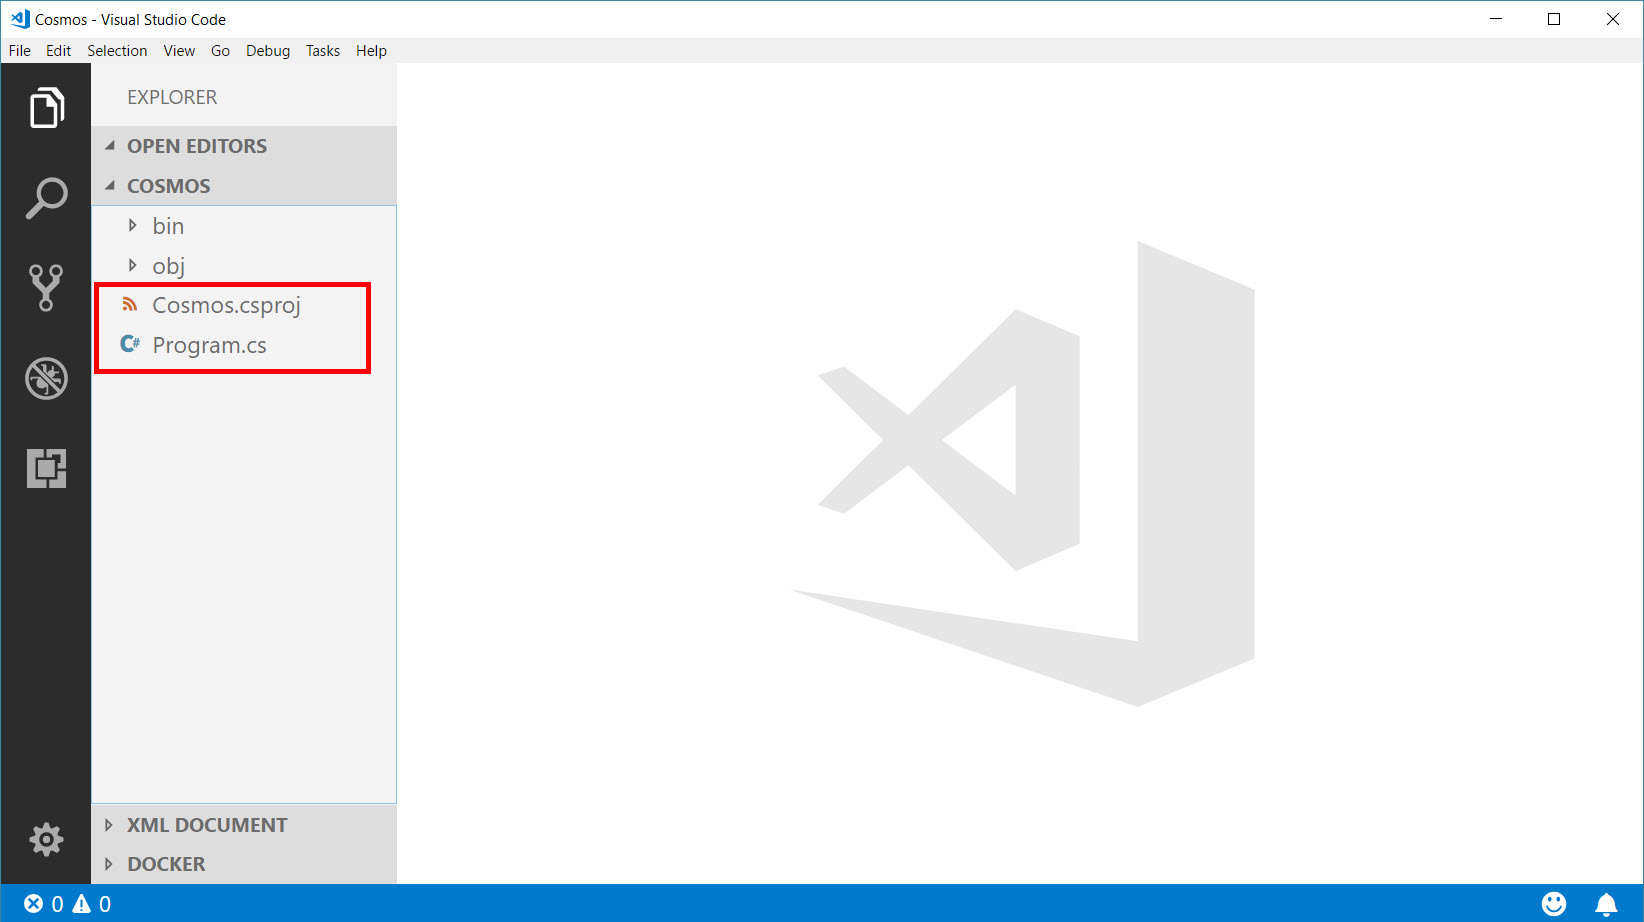
Observe the Program.cs and [folder name].csproj files created by the .NET Core CLI.

Create CosmosClient Instance
The CosmosClient class is the main “entry point” to using the Core (SQL) API in Azure Cosmos DB. We are going to create an instance of the CosmosClient class by passing in connection metadata as parameters of the class’ constructor. We will then use this class instance throughout the lab.
-
Within the Program.cs editor tab, Add the following using blocks to the top of the editor:
using System; using System.Collections.Generic; using System.Threading.Tasks; using Microsoft.Azure.Cosmos; -
Within the
Programclass, add the following lines of code to create variables for your connection information and Cosmos client:private static readonly string _endpointUri = ""; private static readonly string _primaryKey = ""; private static CosmosClient _client = new CosmosClient(_endpointUri, _primaryKey); -
For the
_endpointUrivariable, replace the placeholder value with the URI value from your Azure Cosmos DB accountFor example, if your uri is
https://cosmosacct.documents.azure.com:443/, your new variable assignment will look like this:private static readonly string _endpointUri = "https://cosmosacct.documents.azure.com:443/"; -
For the
_primaryKeyvariable, replace the placeholder value with the PRIMARY KEY value from your Azure Cosmos DB accountFor example, if your primary key is
elzirrKCnXlacvh1CRAnQdYVbVLspmYHQyYrhx0PltHi8wn5lHVHFnd1Xm3ad5cn4TUcH4U0MSeHsVykkFPHpQ==, your new variable assignment will look like this:private static readonly string _primaryKey = "elzirrKCnXlacvh1CRAnQdYVbVLspmYHQyYrhx0PltHi8wn5lHVHFnd1Xm3ad5cn4TUcH4U0MSeHsVykkFPHpQ==";Keep the URI and PRIMARY KEY values recorded, you will use them again later in this lab.
-
Locate the
Mainmethod and replace it with the following asyncMainmethod:public class Program { public static async Task Main(string[] args) { } } -
Your
Programclass definition should now look like this:public class Program { private static readonly string _endpointUri = "<your uri>"; private static readonly string _primaryKey = "<your key>"; private static CosmosClient _client = new CosmosClient(_endpointUri, _primaryKey); public static async Task Main(string[] args) { } }We will now execute a build of the application to make sure our code compiles successfully.
-
Save all of your open editor tabs.
-
In the open terminal pane, enter and execute the following command:
dotnet buildThis command will build the console project, ensure there are no errors.
Create Database using the SDK
- Create a new method called
InitializeDatabase()below theMain()method:
    private static async Task<Database> InitializeDatabase(CosmosClient client, string databaseId)
    {
        Database database = await client.CreateDatabaseIfNotExistsAsync(databaseId);
        await Console.Out.WriteLineAsync($"Database Id:\t{database.Id}");
        return database;
    }
This code will check to see if a database exists in your Azure Cosmos DB account with the passed in name. If a database that matches does not exist, it will create a new database and return it.
-
Locate the
Mainmethod and add the following code to the method to create a newDatabaseinstance if one does not already exist:Database database = await InitializeDatabase(_client, "EntertainmentDatabase"); -
The
Mainmethod should now look like this:public static async Task Main(string[] args) { Database database = await InitializeDatabase(_client, "EntertainmentDatabase"); } -
Save all of your open editor tabs.
-
In the open terminal pane, enter and execute the following command:
dotnet runObserve the output of the running command. In the console window, you will see the ID string for the database resource in your Azure Cosmos DB account.
Create a Partitioned Container using the SDK
To create a container, you must specify a name and a partition key path. A partition key is a logical hint for distributing data onto a scaled out underlying set of physical partitions and for efficiently routing queries to the appropriate underlying partition. To learn more, refer to docs.microsoft.com/azure/cosmos-db/partition-data.
- Beneath the
InitializeDatabasemethod, create the following new method:
    private static async Task<Container> InitializeContainer(Database database, string containerId)
    {

    }
-
Add the following code to create a new
IndexingPolicyinstance with a custom indexing policy configured:IndexingPolicy indexingPolicy = new IndexingPolicy { IndexingMode = IndexingMode.Consistent, Automatic = true, IncludedPaths = { new IncludedPath { Path = "/*" } }, ExcludedPaths = { new ExcludedPath { Path = "/\"_etag\"/?" } } };The indexing policy shown here is what is created by default if an indexing policy is not defined. By default, all Azure Cosmos DB data is indexed. Many customers are happy to let Azure Cosmos DB automatically index all data. However you can specify a custom indexing policy. Typically this would be excluding specific paths from being indexed which can improve the performance for writes. However, if the path that is excluded is used in queries, it will result in errors and requiring rebuilding the index so it is best to know for sure whether it will be used in queries before excluding it from the index.
-
Beneath the indexing policy add the following code to create a new
ContainerPropertiesinstance with a partition key of/typeand include the previously createdIndexingPolicy:ContainerProperties containerProperties = new ContainerProperties(containerId, "/type") { IndexingPolicy = indexingPolicy };This definition will create a partition key on the
/typepath. Partition key paths are case sensitive. This is especially important when you consider JSON property casing in the context of .NET CLR object to JSON object serialization. -
Add the following lines of code to create a new
Containerinstance if one does not already exist within your database. Specify the previously created settings and a value for throughput:Container container = await database.CreateContainerIfNotExistsAsync(containerProperties, 400);This code will check to see if a container exists in your database that meets all of the specified parameters. If a container that matches does not exist, it will create a new container. Here is where we can specify the RU/s allocated for a newly created container. If this is not specified, the SDK creates a container with a default value of 400 RU/s.
-
Add the following code to print out the ID of the database and return the container :
 await Console.Out.WriteLineAsync($"Container Id:\t{container.Id}");
 return container;
The
containervariable will have metadata about the container whether a new container is created or an existing one is read. -
Locate the
InitializeDatabase()line within theMainmethod and add a call to theInitializeContainer()method to create a newContainerinstance if one does not already exist:Container container = await InitializeContainer(database, "EntertainmentContainer"); -
Your
Mainmethod should now look like this :public static async Task Main(string[] args) { Database database = await InitializeDatabase(_client, "EntertainmentDatabase"); Container container = await InitializeContainer(database, "EntertainmentContainer"); } -
Save all of your open editor tabs.
-
In the open terminal pane, enter and execute the following command:
dotnet run -
Observe the output of the running command.
Populate a Container with Items using the SDK
You will now use the .NET SDK to populate your container with various items of varying schemas. These items will be serialized instances of multiple C# classes in your project.
Populate Container with Data
-
In the Visual Studio Code window, look in the Explorer pane and verify that you have a DataTypes.cs file in your project folder. This file contains the data classes you will be working with in the following steps. If it is not in your project folder, you can copy it from this path in the cloned repo here
\labs\dotnet\setup\templates\Lab01\DataTypes.cs -
Switch to the Program.cs file in Visual Studio code
-
Beneath the
InitializeContainer()method, create the following new method:private static async Task LoadFoodAndBeverage(Container container) { }For the next few instructions, we will use the Bogus library to create test data. This library allows you to create a collection of objects with fake data set on each object’s property. For this lab, our intent is to focus on Azure Cosmos DB instead of this library. With that intent in mind, the next set of instructions will expedite the process of creating test data.
-
Add the following code in the method above to create an enumerable collection of
PurchaseFoodOrBeverageinstances:var foodInteractions = new Bogus.Faker<PurchaseFoodOrBeverage>() .RuleFor(i => i.id, (fake) => Guid.NewGuid().ToString()) .RuleFor(i => i.type, (fake) => nameof(PurchaseFoodOrBeverage)) .RuleFor(i => i.unitPrice, (fake) => Math.Round(fake.Random.Decimal(1.99m, 15.99m), 2)) .RuleFor(i => i.quantity, (fake) => fake.Random.Number(1, 5)) .RuleFor(i => i.totalPrice, (fake, user) => Math.Round(user.unitPrice * user.quantity, 2)) .GenerateLazy(100);As a reminder, the Bogus library generates a set of test data. In this example, you are creating 100 items using the Bogus library and the rules listed above. The GenerateLazy method tells the Bogus library to prepare for a request of 100 items by returning a variable of type IEnumerable. Since LINQ uses deferred execution by default, the items aren’t actually created until the collection is iterated.
-
Next add the following foreach block to iterate over the
PurchaseFoodOrBeverageinstances:foreach(var interaction in foodInteractions) { } -
Within the
foreachblock, add the following line of code to asynchronously create a container item and save the result of the creation task to a variable:ItemResponse<PurchaseFoodOrBeverage> result = await container.CreateItemAsync(interaction, new PartitionKey(interaction.type));The
CreateItemAsyncmethod takes in an object that you would like to serialize into JSON and store as a document within the specified container. You can also specify the logical partition for this data as well. In this case it is the name of the PurchaseFoodOrBeverage class. Theidproperty, which is generated as a unique Guid for each new object as shown in theDataTypes.csclass, is a special required value in Cosmos DB that is used for indexing and must be unique for every item in a logical partition. -
Still within the
foreachblock, add the following line of code to write the value of the newly created resource’sidproperty to the console:await Console.Out.WriteLineAsync($"Item Created\t{result.Resource.id}");The
CosmosItemResponsetype has a property namedResourcethat contains the object representing the item as well as other properties to give you access to interesting data about an item such as the Request Charge to do the insert operation or its ETag. -
Your
LoadFoodAndBeverage()method should look like this:private static async Task LoadFoodAndBeverage(Container container) { var foodInteractions = new Bogus.Faker<PurchaseFoodOrBeverage>() .RuleFor(i => i.id, (fake) => Guid.NewGuid().ToString()) .RuleFor(i => i.type, (fake) => nameof(PurchaseFoodOrBeverage)) .RuleFor(i => i.unitPrice, (fake) => Math.Round(fake.Random.Decimal(1.99m, 15.99m), 2)) .RuleFor(i => i.quantity, (fake) => fake.Random.Number(1, 5)) .RuleFor(i => i.totalPrice, (fake, user) => Math.Round(user.unitPrice * user.quantity, 2)) .GenerateLazy(100); foreach (var interaction in foodInteractions) { ItemResponse<PurchaseFoodOrBeverage> result = await container.CreateItemAsync(interaction, new PartitionKey(interaction.type)); await Console.Out.WriteLineAsync($"Item Created\t{result.Resource.id}"); } } -
Locate the
InitalizeContainer()method within theMainmethod and add the following code to the method to call theLoadFoodAndBeverage()method:await LoadFoodAndBeverageAsync(container); -
Your
Main()method should now look like this :public static async Task Main(string[] args) { Database database = await InitializeDatabase(_client, "EntertainmentDatabase"); Container container = await InitializeContainer(database, "EntertainmentContainer"); await LoadFoodAndBeverage(container); } -
Save all of your open editor tabs.
-
Switch to the terminal pane, enter and execute the following command:
dotnet run -
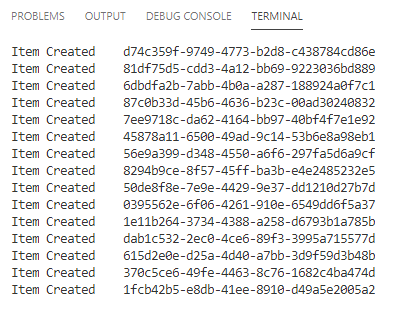
Observe the output of the console application. You should see a list of item ids associated with new items that are being created by this tool.

Populate Container with Data of Different Types
-
Beneath the
LoadFoodAndBeverage()method, create the following new method::private static async Task LoadTelevision(Container container) { } -
Add the following code in the method above to create an enumerable collection of
WatchLiveTelevisionChannelinstances:var tvInteractions = new Bogus.Faker<WatchLiveTelevisionChannel>() .RuleFor(i => i.id, (fake) => Guid.NewGuid().ToString()) .RuleFor(i => i.type, (fake) => nameof(WatchLiveTelevisionChannel)) .RuleFor(i => i.minutesViewed, (fake) => fake.Random.Number(1, 45)) .RuleFor(i => i.channelName, (fake) => fake.PickRandom(new List<string> { "NEWS-6", "DRAMA-15", "ACTION-12", "DOCUMENTARY-4", "SPORTS-8" })) .GenerateLazy(100); foreach (var interaction in tvInteractions) { ItemResponse<WatchLiveTelevisionChannel> result = await container.CreateItemAsync(interaction, new PartitionKey(interaction.type)); await Console.Out.WriteLineAsync($"Item Created\t{result.Resource.id}"); } -
Go to your
Mainmethod and add a new line to callLoadTelevision()and comment outLoadFoodAndBeverage(). The method should now look like this :public static async Task Main(string[] args) { Database database = await InitializeDatabase(_client, "EntertainmentDatabase"); Container container = await InitializeContainer(database, "EntertainmentContainer"); //await LoadFoodAndBeverage(container); await LoadTelevision(container); } -
Save all of your open editor tabs.
-
Switch to the terminal pane, enter and execute the following command:
dotnet run -
Observe the output of the console application. You should see a list of item ids associated with new items that are being created.
-
Beneath the
LoadTelevision()method create a new methodLoadMapViews()with the following implementation:private static async Task LoadMapViews(Container container) { var mapInteractions = new Bogus.Faker<ViewMap>() .RuleFor(i => i.id, (fake) => Guid.NewGuid().ToString()) .RuleFor(i => i.type, (fake) => nameof(ViewMap)) .RuleFor(i => i.minutesViewed, (fake) => fake.Random.Number(1, 45)) .GenerateLazy(100); foreach (var interaction in mapInteractions) { ItemResponse<ViewMap> result = await container.CreateItemAsync(interaction); await Console.Out.WriteLineAsync($"Item Created\t{result.Resource.id}"); } } -
Go to your
Main()method and add a new line to callLoadMapViews()and comment outLoadTelevision(). The method should now look like this :public static async Task Main(string[] args) { Database database = await InitializeDatabase(_client, "EntertainmentDatabase"); Container container = await InitializeContainer(database, "EntertainmentContainer"); //await LoadFoodAndBeverage(container); //await LoadTelevision(container); await LoadMapViews(container); } -
Save all of your open editor tabs.
-
Switch to the terminal pane, enter and execute the following command:
dotnet run -
Observe the output of the console application. You should see a list of item ids associated with new items that are being created. You have now placed three different types of documents (PurchaseFoodOrBeverage, WatchLiveTelevisionChannel, ViewMap) into the
EntertainmentContainershowing how Cosmos DB is schema-less. -
Close the folder in Visual Studio Code
If this is your final lab, follow the steps in Removing Lab Assets to remove all lab resources.