Indexing in Azure Cosmos DB
In this lab, you will modify the indexing policy of an Azure Cosmos DB container. You will explore how you can optimize indexing policy for write or read heavy workloads as well as understand the indexing requirements for different SQL API query features.
If this is your first lab and you have not already completed the setup for the lab content see the instructions for Account Setup before starting this lab.
Indexing Overview
Azure Cosmos DB is a schema-agnostic database that allows you to iterate on your application without having to deal with schema or index management. By default, Azure Cosmos DB automatically indexes every property for all items in your container without the need to define any schema or configure secondary indexes. If you chose to leave indexing policy at the default settings, you can run most queries with optimal performance and never have to explicitly consider indexing. However, if you want control over adding or removing properties from the index, modification is possible through the Azure Portal, ARM template, PowerShell, Azure CLI or any Cosmos DB SDK.
Azure Cosmos DB uses an inverted index, representing your data in a tree form. For a brief introduction on how this works, read our indexing overview before continuing with the lab.
Customizing the indexing policy
In this lab section, you will view and modify the indexing policy for your FoodCollection.
Open Data Explorer
-
On the left side of the portal, select the Resource groups link.
-
In the Resource groups blade, locate and select the cosmoslabs resource group.
-
In the cosmoslabs blade, select your Azure Cosmos DB account.
-
In the Azure Cosmos DB blade, locate and select the Data Explorer link on the left side of the blade.
-
In the Data Explorer section, expand the NutritionDatabase database node and then expand the FoodCollection container node.
-
Within the FoodCollection node, select the Items link.
-
View the items within the container. Observe how these documents have many properties, including arrays. If we do not use a particular property in the WHERE clause, ORDER BY clause, or a JOIN, indexing the property does not provide any performance benefit.
- Still within the FoodCollection node, select the Scale & Settings link.
-
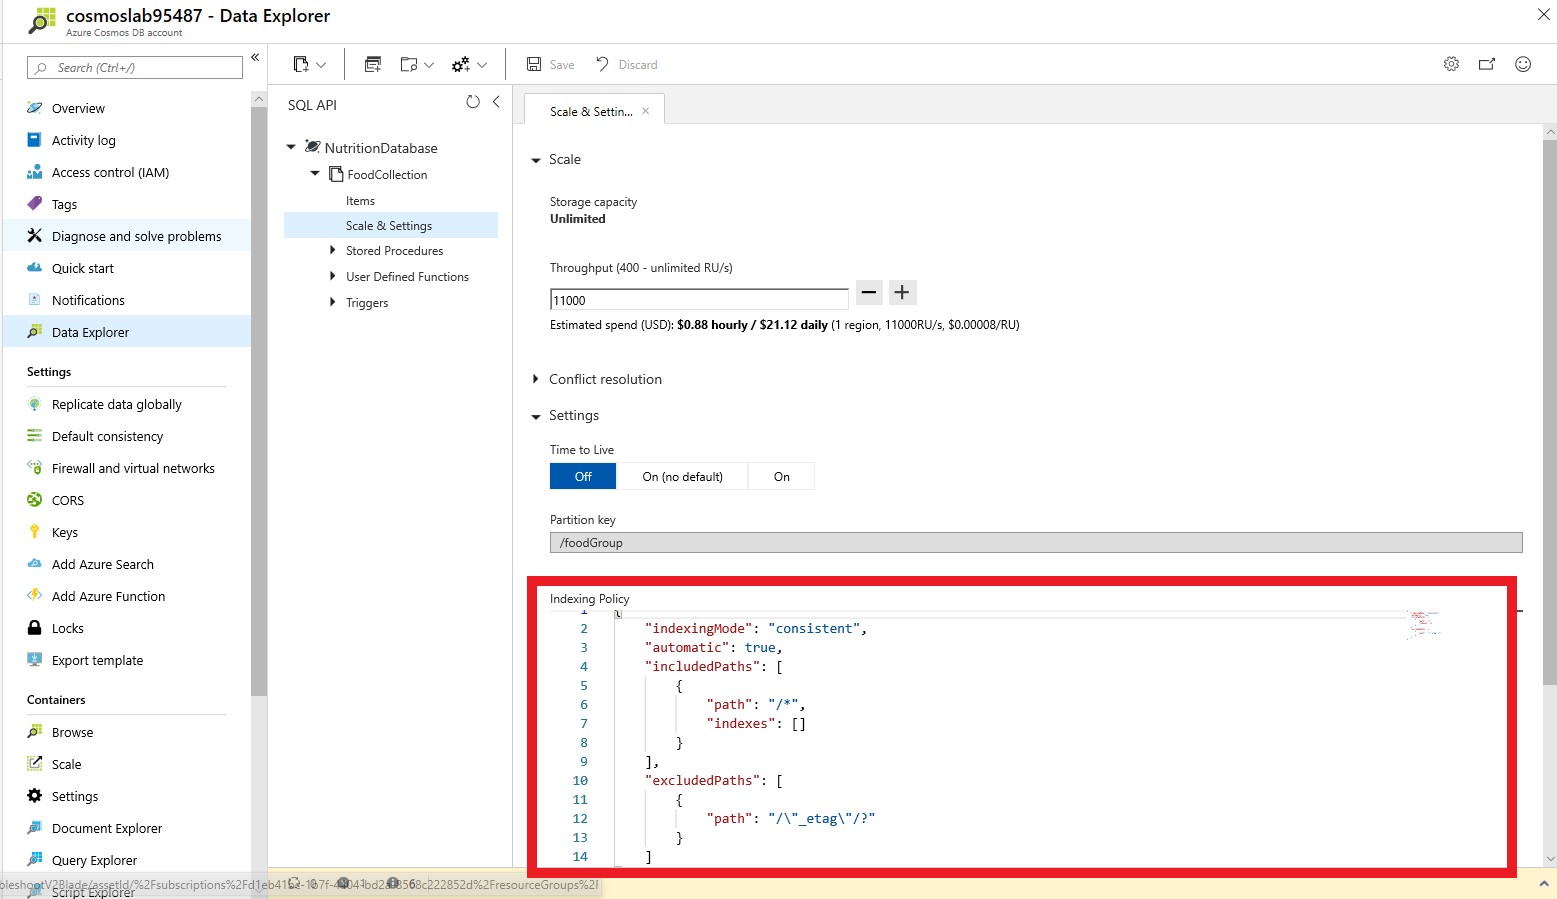
Review the Indexing Policy section
- Notice you can edit the JSON file that defines your container’s index
- An Indexing policy can also be modified through any Azure Cosmos DB SDK as well as ARM template, PowerShell or Azure CLI
- During this lab we will modify the indexing policy through the Azure Portal

Including and excluding Indexes
Instead of including an index on every property by default, you can chose to either include or exclude specific paths from the index. Let’s go through some simple examples (no need to enter these into the Azure Portal, we can just review them here).
Within the FoodCollection, documents have this schema (some properties were removed for simplicity):
{
    "id": "36000",
    "_rid": "LYwNAKzLG9ADAAAAAAAAAA==",
    "_self": "dbs/LYwNAA==/colls/LYwNAKzLG9A=/docs/LYwNAKzLG9ADAAAAAAAAAA==/",
    "_etag": "\"0b008d85-0000-0700-0000-5d1a47e60000\"",
    "description": "APPLEBEE'S, 9 oz house sirloin steak",
    "tags": [
        {
            "name": "applebee's"
        },
        {
            "name": "9 oz house sirloin steak"
        }
    ],
    "manufacturerName": "Applebee's",
    "foodGroup": "Restaurant Foods",
    "nutrients": [
        {
            "id": "301",
            "description": "Calcium, Ca",
            "nutritionValue": 16,
            "units": "mg"
        },
        {
            "id": "312",
            "description": "Copper, Cu",
            "nutritionValue": 0.076,
            "units": "mg"
        },
    ]
}
If you wanted to only index the manufacturerName, foodGroup, and nutrients array, you should define the following index policy. In this example, we use the wildcard character * to indicate that we would like to index all paths within the nutrients array.
{
    "indexingMode": "consistent",
    "automatic": true,
    "includedPaths": [
        {
            "path": "/manufacturerName/*"
        },
        {
            "path": "/foodGroup/*"
        },
        {
            "path": "/nutrients/[]/*"
        }
    ],
    "excludedPaths": [
        {
            "path": "/*"
        }
    ]
}
However, it’s possible we may just want to index the nutritionValue of each array element.
In this next example, the indexing policy would explicitly specify that the nutritionValue path in the nutrition array should be indexed. Since we don’t use the wildcard character *, no additional paths in the array are indexed.
{
    "indexingMode": "consistent",
    "automatic": true,
    "includedPaths": [
        {
            "path": "/manufacturerName/*"
        },
        {
            "path": "/foodGroup/*"
        },
        {
            "path": "/nutrients/[]/nutritionValue/*"
        }
    ],
    "excludedPaths": [
        {
            "path": "/*"
        }
    ]
}
Finally, it’s important to understand the difference between the * and ? characters.
The * character indicates that Azure Cosmos DB should index every path beyond that specific node.
The ? character indicates that Azure Cosmos DB should index no further paths beyond this node.
In the above example, there are no additional paths under nutritionValue. If we were to modify the document and add a path here, having the wildcard character * in the above example would ensure that the property is indexed without explicitly mentioning the name.
Understand query requirements
Before modifying indexing policy, it’s important to understand how the data is used in the collection.
If your workload is write-heavy or your documents are large, you should only index necessary paths. This will significantly decrease the amount of RU’s required for inserts, updates, and deletes.
Let’s imagine that the following queries are the only read operations that are executed on the FoodCollection container.
Query #1
SELECT * FROM c WHERE c.manufacturerName = <manufacturerName>
Query #2
SELECT * FROM c WHERE c.foodGroup = <foodGroup>
These queries only require an index be defined on manufacturerName and foodGroup. We can modify the indexing policy to index only these properties.
Edit the indexing policy by including paths
- In the Azure Portal, navigate back to the FoodCollection container
- Select the Scale & Settings link
-
In the Indexing Policy section, replace the existing json file with the following:
 {
     "indexingMode": "consistent",
     "automatic": true,
     "includedPaths": [
         {
             "path": "/manufacturerName/*"
         },
         {
             "path": "/foodGroup/*"
         }
     ],
     "excludedPaths": [
         {
             "path": "/*"
         }
     ]
 }
This new indexing policy will create an index on only the manufacturerName and foodGroup properties. It will remove indexes on all other properties.
-
Select Save. Azure Cosmos DB will update the index in the container, using your excess provisioned throughput to make the updates.
During the container re-indexing, write performance is unaffected. Queries run during the index update will not use the new index policy until it has been rebuilt.
- In the menu, select the New SQL Query icon.
-
Paste the following SQL query and select Execute Query:
SELECT * FROM c WHERE c.manufacturerName = "Kellogg, Co." -
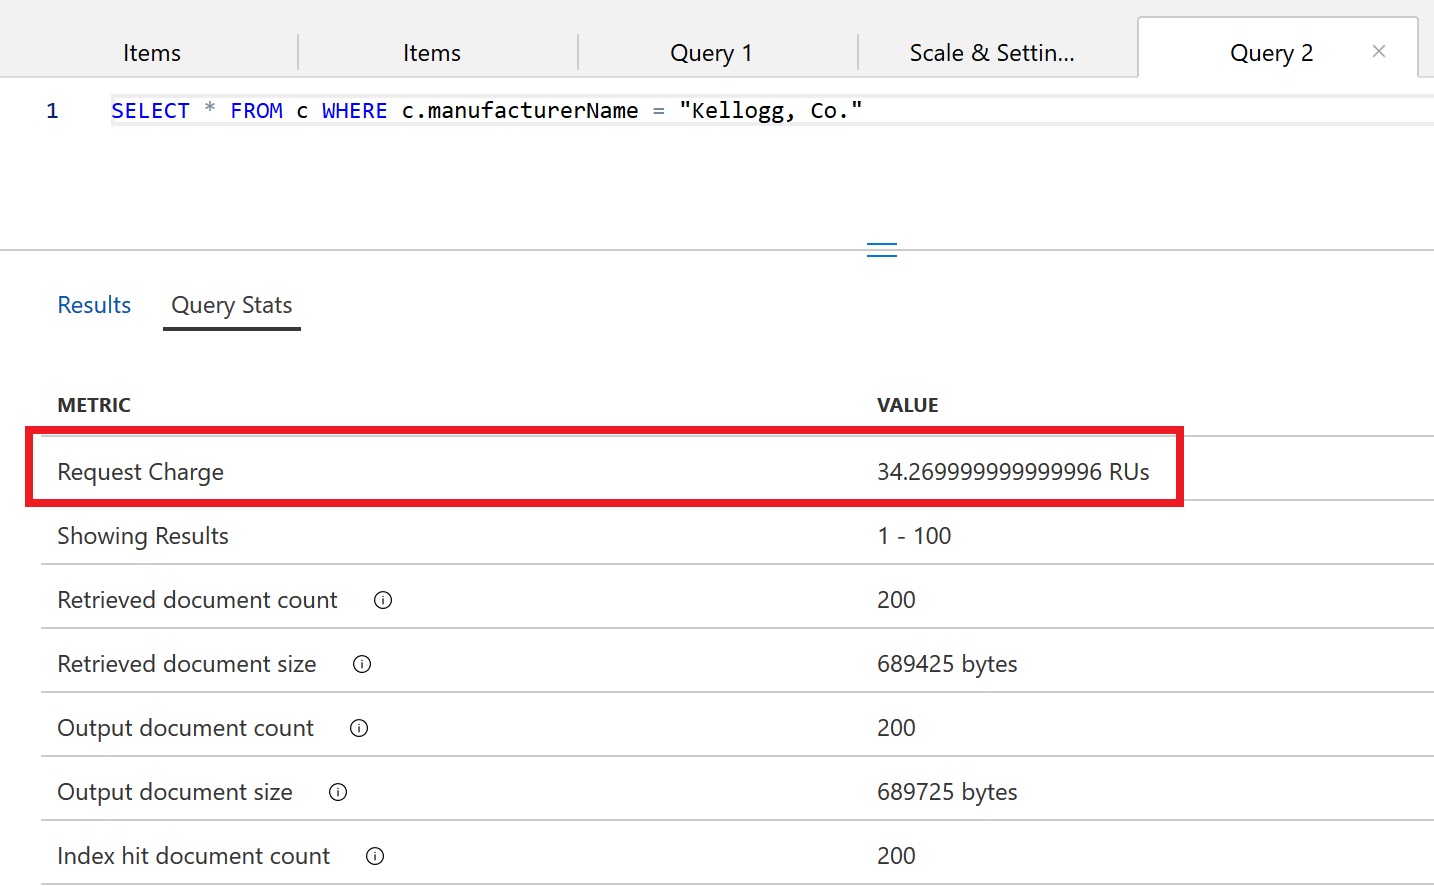
Navigate to the Query Stats tab. You should observe that this query still has a low RU charge, even after removing some properties from the index. Because the manufacturerName was the only property used as a filter in the query, it was the only index that was required.
-
Replace the query text with the following and select Execute Query:
SELECT * FROM c WHERE c.description = "Bread, blue corn, somiviki (Hopi)" -
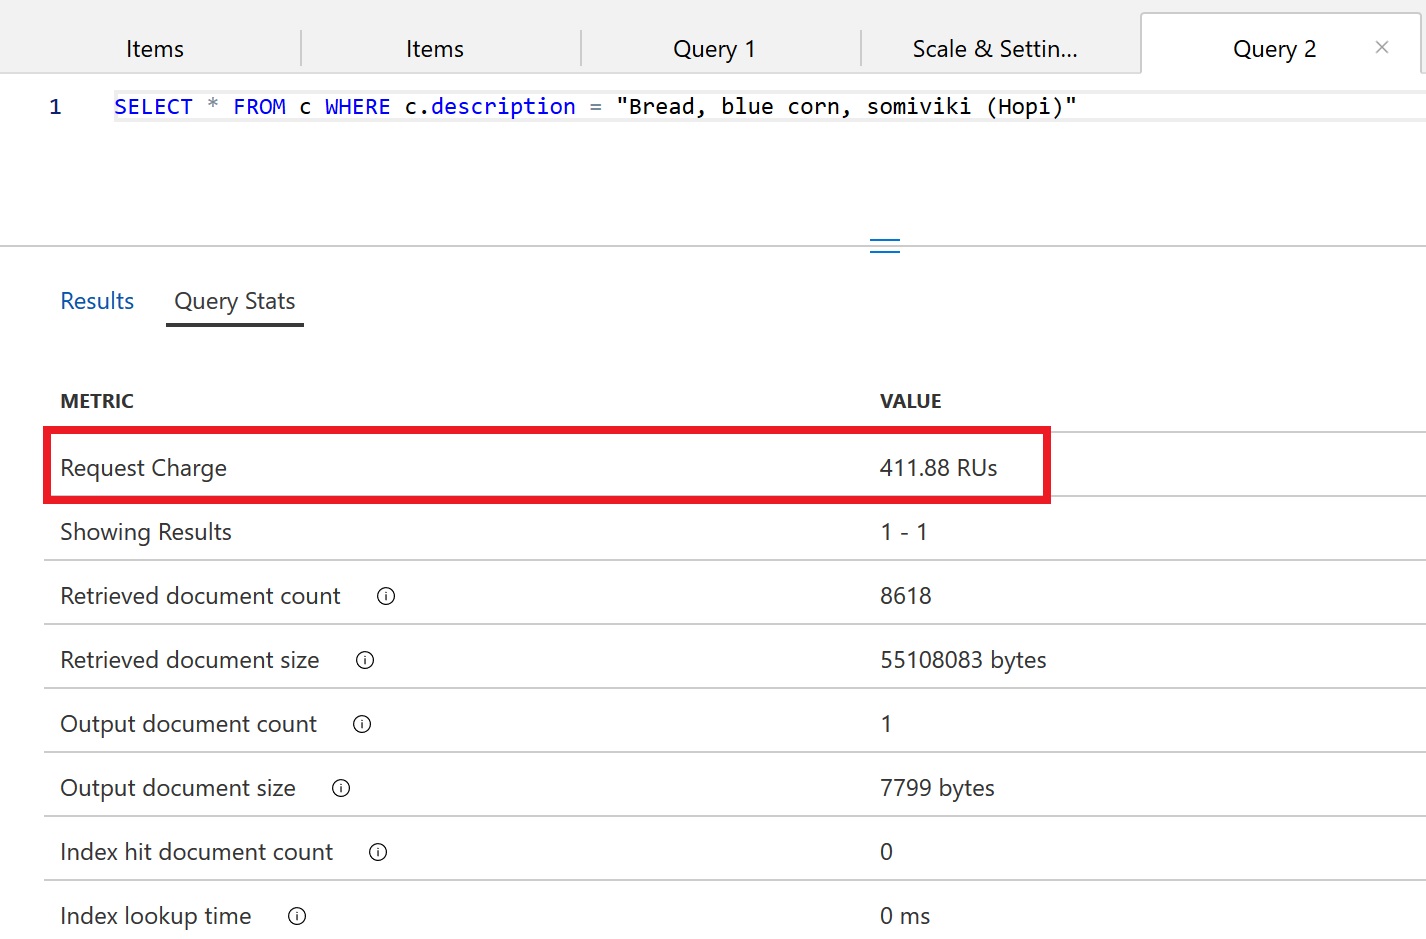
Observe that this query has a very high RU charge even though only a single document is returned. This is because no index is currently defined for the
descriptionproperty. -
Observe the Query Metrics:
If a query does not use the index, the Index hit document count will be 0. We can see above that the query needed to retrieve 8,618 documents and ultimately ended up only returning 1 document.
Edit the indexing policy by excluding paths
In addition to manually including certain paths to be indexed, you can exclude specific paths. In many cases, this approach can be simpler since it will allow all new properties in your document to be indexed by default. If there is a property that you are certain you will never use in your queries, you should explicitly exclude this path.
We will create an indexing policy to index every path except for the description property.
- Navigate back to the FoodCollection in the Azure Portal
- Select the Scale & Settings link
-
In the Indexing Policy section, replace the existing json file with the following:
 {
     "indexingMode": "consistent",
     "automatic": true,
     "includedPaths": [
         {
             "path": "/*"
         }
     ],
     "excludedPaths": [
         {
             "path": "/description/*"
         }
     ]
 }
This new indexing policy will create an index on every property except for the description.
-
Select Save. Azure Cosmos DB will update the index in the container, using your excess provisioned throughput to make the updates.
During the container re-indexing, write performance is unaffected. Queries run during the index update will not use the new index policy until it has been rebuilt.
-
After defining the new indexing policy, navigate to your FoodCollection and select the Add New SQL Query icon. Paste the following SQL query and select Execute Query:
SELECT * FROM c WHERE c.manufacturerName = "Kellogg, Co." -
Navigate to the Query Stats tab. You should observe that this query still has a low RU charge since manufacturerName is indexed.
-
Replace the query text with the following and select Execute Query:
SELECT * FROM c WHERE c.description = "Bread, blue corn, somiviki (Hopi)" - Observe that this query has a very high RU charge even though only a single document is returned. This is because the
descriptionproperty is explicitly excluded in the indexing policy.
Adding a Composite Index
For ORDER BY queries that order by multiple properties, a composite index is required. A composite index is defined on multiple properties and must be manually created.
- In the Azure Cosmos DB blade, locate and select the Data Explorer link on the left side of the blade.
- In the Data Explorer section, expand the NutritionDatabase database node and then expand the FoodCollection container node.
- Select the icon to add a New SQL Query.
-
Paste the following SQL query and select Execute Query
SELECT * FROM c ORDER BY c.foodGroup ASC, c.manufacturerName ASCThis query will fail with the following error:
"The order by query does not have a corresponding composite index that it can be served from."In order to run a query that has an ORDER BY clause with one property, the default index is sufficient. Queries with multiple properties in the ORDER BY clause require a composite index.
-
Still within the FoodCollection node, select the Scale & Settings link. In the Indexing Policy section, you will add a composite index.
-
Replace the Indexing Policy with the following text:
{ "indexingMode": "consistent", "automatic": true, "includedPaths": [ { "path": "/manufacturerName/*" }, { "path": "/foodGroup/*" } ], "excludedPaths": [ { "path": "/*" }, { "path": "/\"_etag\"/?" } ], "compositeIndexes": [ [ { "path": "/foodGroup", "order": "ascending" }, { "path": "/manufacturerName", "order": "ascending" } ] ] } -
Save this new indexing policy. The update should take approximately 10-15 seconds to apply to your container.
This indexing policy defines a composite index that allows for the following ORDER BY queries. Test each of these by running them in your existing open query tab in the Data Explorer. When you define the order for properties in a composite index, they must either exactly match the order in the ORDER BY clause or be, in all cases, the opposite value.
-
Run the following queries.
SELECT * FROM c ORDER BY c.foodGroup ASC, c.manufacturerName ASC -
Run the following query, which the current composite index does not support.
SELECT * FROM c ORDER BY c.foodGroup DESC, c.manufacturerName ASC -
This query will not run without an additional composite index. Modify the indexing policy to include an additional composite index.
{ "indexingMode": "consistent", "automatic": true, "includedPaths": [ { "path": "/manufacturerName/*" }, { "path": "/foodGroup/*" } ], "excludedPaths": [ { "path": "/*" }, { "path": "/\"_etag\"/?" } ], "compositeIndexes": [ [ { "path": "/foodGroup", "order": "ascending" }, { "path": "/manufacturerName", "order": "ascending" } ], [ { "path": "/foodGroup", "order": "descending" }, { "path": "/manufacturerName", "order": "ascending" } ] ] } - Re-run the query, it should succeed.
Adding a spatial index
Create a new container with volcano data
Azure Cosmos DB supports querying of data in the GeoJSON format. During this lab, you will upload sample data to this container that is specified in this format. This volcano.json sample data is a better fit for geo-spatial queries than our existing nutrition dataset. The dataset contains the coordinates and basic information for many volcanoes around the world.
First, you will create a new Cosmos container named volcanoes inside a new database.
-
In the Azure Cosmos DB blade, locate and select the Data Explorer link on the left side of the blade.
-
Select the icon to add a New Container
-
In the Add Container popup, perform the following actions:
-
In the Database id field, select the Create new option and enter the value VolcanoDatabase.
-
Ensure the Provision database throughput option is not selected.
Provisioning throughput for a database allows you to share the throughput among all the containers that belong to that database. Within an Azure Cosmos DB database, you can have a set of containers which shares the throughput as well as containers, which have dedicated throughput.
-
In the Container Id field, enter the value VolcanoContainer.
-
In the Partition key field, enter the value
/Country. -
In the Throughput field, enter the value
5000. -
Select the OK button.
-
Upload Sample Data
- Navigate to the VolcanoesContainer in the Azure Portal
- Select the Items section
- Select Upload Item
- In the popup, navigate to the VolcanoData.json file. This file was copied in the pre-lab steps, if you do not have it run the account setup steps.
- Select Upload
Create geo-spatial indexes in the Volcanoes container
- Select the Scale & Settings link.
-
In the Indexing Policy section, replace the existing json file with the following:
 {
     "indexingMode": "consistent",
     "automatic": true,
     "includedPaths": [
         {
             "path": "/*"
         }
     ],
     "excludedPaths": [
         {
             "path": "/\"_etag\"/?"
         }
     ],
     "spatialIndexes": [
         {
             "path": "/*",
             "types": [
                 "Point",
                 "Polygon",
                 "MultiPolygon",
                 "LineString"
             ]
         }
     ]
 }
Geo-spatial indexing is by default, disabled. This indexing policy will turn on geo-spatial indexing for all possible GeoJSON types which include Points, Polygons, MultiPolygon, and LineStrings. Similar to range indexes and composite indexes, there are no precision settings for geo-spatial indexes.
Learn more about querying geo-spatial data in Azure Cosmos DB.
Query the Volcano Data
- Navigate back to the VolcanoesContainer in the Azure Portal
- Select the New SQL Query.
-
Paste the following SQL query and select Execute Query.
 SELECT *
 FROM volcanoes v
 WHERE ST_DISTANCE(v.Location, {
 "type": "Point",
 "coordinates": [-122.19, 47.36]
 }) < 100 * 1000
 AND v.Type = "Stratovolcano"
 AND v["Last Known Eruption"] = "Last known eruption from 1800-1899, inclusive"
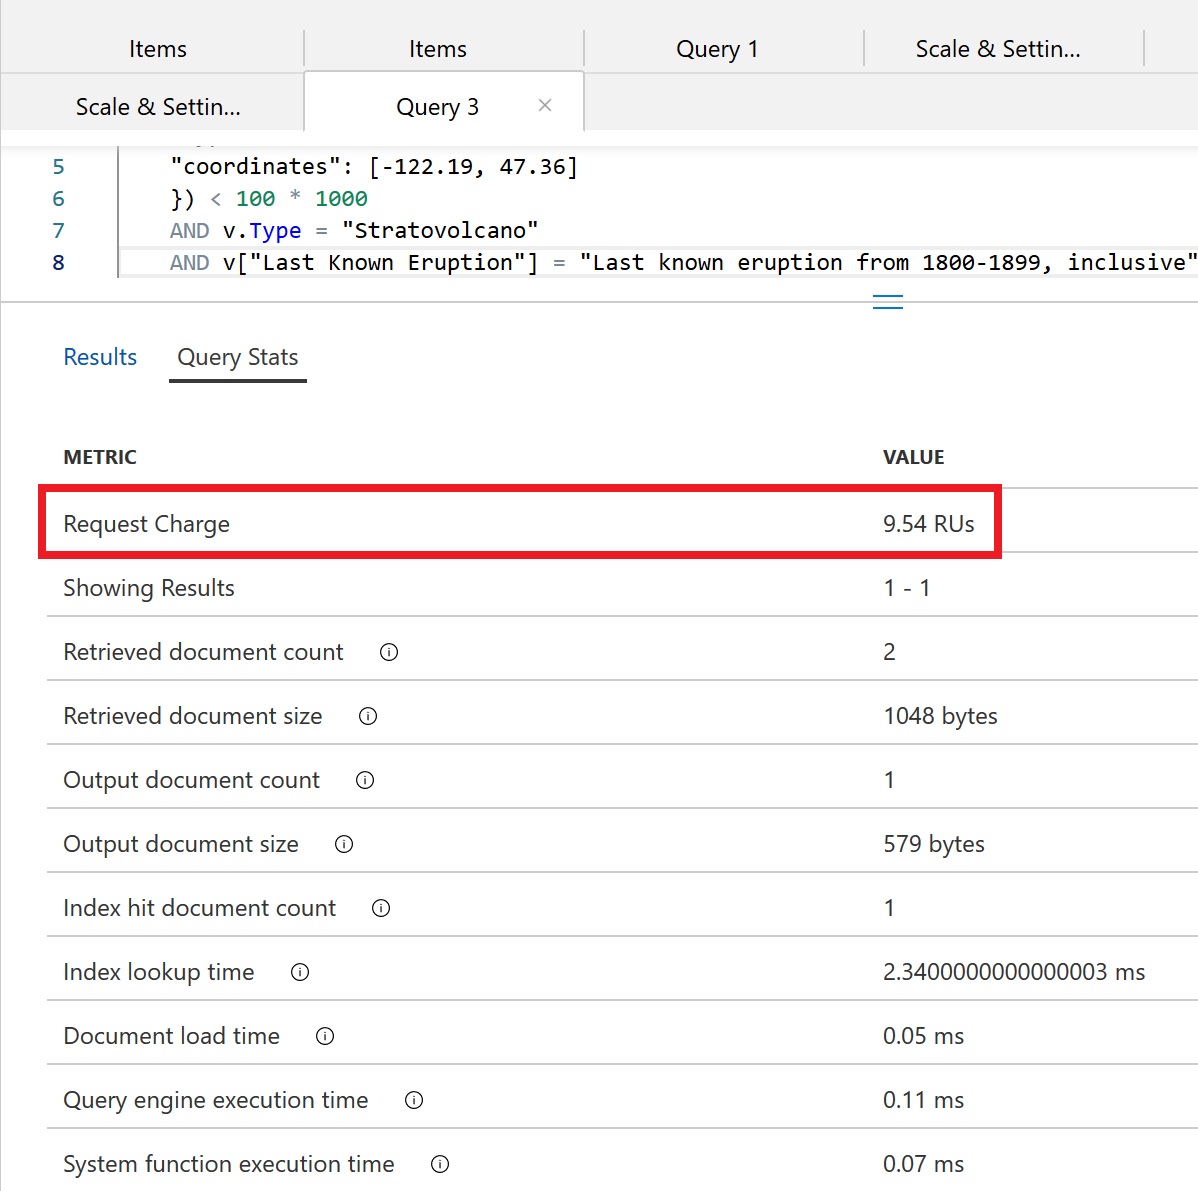
This query returns all the Stratovolcanoes that last erupted between 1800 and 1899 that are within 100 km of the coordinates (122.19, 47.36). These are the coordinates of Redmond, WA.
-
Observe the Query Stats for this operation. Because the container has a geo-spatial index for Points, this query consumed a small amount of RU’s.

Query sample polygon data
If you specify points within a Polygon in a counter-clockwise order, you will define the area within the coordinates as the polygon area. A Polygon specified in clockwise order represents the inverse of the region within it.
We can explore this concept through sample queries.
- Navigate back to the VolcanoesContainer in the Azure Portal
- Select the New SQL Query.
-
Paste the following SQL query and select Execute Query.
SELECT * FROM volcanoes v WHERE ST_WITHIN(v.Location, { "type":"Polygon", "coordinates":[[ [-123.8, 48.8], [-123.8, 44.8], [-119.8, 44.8], [-119.8, 48.8], [-123.8, 48.8] ]] }) -
Review the results, in this case, there are 8 volcanoes located within this rectangle.
-
In the Query Editor replace the text with the following query:
SELECT * FROM volcanoes v WHERE ST_WITHIN(v.Location, { "type":"Polygon", "coordinates":[[ [-123.8, 48.8], [-119.8, 48.8], [-119.8, 44.8], [-123.8, 44.8], [-123.8, 48.8] ]] }) - Review the results, you should now see many items returned. There are thousands of volcanoes located outside our small rectangle region.
When creating a GeoJSON polygon, whether it be inside a query or item, the order of the coordinates specified matters. Azure Cosmos DB will not reject coordinates that indicate the inverse of a polygon’s shape. In addition, GeoJSON requires that you specify coordinates in the format: (longitude, latitude).
Lab Cleanup
Restoring the FoodCollection Indexing Policy
You should restore the FoodCollection indexing policy to the default setting where all paths are indexed.
- In the Azure Cosmos DB blade, locate and select the Data Explorer link on the left side of the blade.
- In the Data Explorer section, expand the NutritionDatabase database node and then expand the FoodCollection container node.
- Within the FoodCollection node, select the Scale & Settings link.
-
In the Indexing Policy section, replace the existing JSON file with the following:
{ "indexingMode": "consistent", "automatic": true, "includedPaths": [ { "path": "/*" } ], "excludedPaths": [ { "path": "/\"_etag\"/?" } ] } - Select Save to apply these changes. This Indexing Policy is the same Indexing Policy as when we began the lab and is required for subsequent labs.
Delete the VolcanoContainer
You will not need the VolcanoContainer during additional lab sections. You can delete this container now. Or otherwise reduce it’s RU/s to 400 RU/s.
- Navigate to the Data Explorer
- Select the three dots near your VolcanoContainer. From the menu, select Delete Container.
- Confirm the container’s name and delete the container.
- Close your browser window. You have now completed the indexing lab section.
If this is your final lab, follow the steps in Removing Lab Assets to remove all lab resources.

